
This article will help you whether you want to make a blog or a personal website. This article shows you step-by-step how to use WordPress to make a blog or website. If you follow these steps, making a blog for yourself will be easy.


do you know? Most people use WordPress to make a website or blog. W3Techs says that 65% of all Content Management System (CMS) websites in the world use WordPress.
So, we’re going to show you step by step how to make a blog on WordPress today.
- This article will teach you a lot of things, such as:
- How to buy a domain name for a website or blog?
- How and where to buy hosting for a website?
- How do I link my Domain to my Hosting?
- How do I put WordPress in place?
- How do I use a theme on my WordPress site?
All of these are easy to understand because we showed you screenshots of each step. We hope that this information will help you.
How to create WordPress blog?
Follow these 5 steps to make a blog or website with WordPress:
- Purchase Domain Name
- Choose a good company to host your site
- Link the domain to the hosting
- install wordpress
- pick a great theme
Let’s look at these 5 steps to make a website in more depth:
1. Pay for a domain name
If you don’t know what a domain name is, we’ll tell you in simple terms that it is the name of your website. Like, our website is called webinhindi.com.
Now comes the question of where to buy a domain name. We’ve written a detailed article on this topic, which you can read here: Where to buy domain name cheaply?

Here are some of the best sites to buy domain names:
- Namecheap.com
- Namesilo.com
- Godaddy.com
- Dynadot.com
The one I like the most is Namesilo, so I’ll show you how to buy a domain from this site. You can also choose a different business. Almost every website has almost the same way to buy a domain.
Let’s look at how to get a discount on a domain name from namesilo.com:

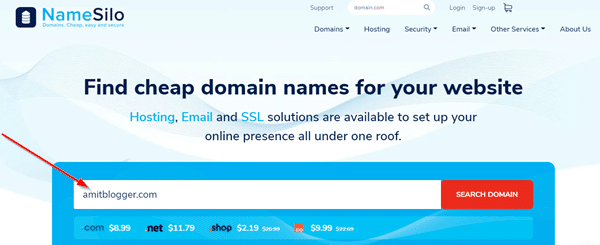
Open the Namesilo website, type the domain name you want to buy in the text box, and click on Search Domain.
If the domain name for that name is available, you can add it to your cart by clicking the “Add” button. If the domain isn’t available, you’ll have to look for it under a different name.
After that, click “Checkout” and then “Cart” at the top. This is how the next page will look:

Carefully choose the options as shown in the picture above. Pay close attention to three things:
Auto-Renew: Make it NO.
Privacy Setting: If you choose WHOIS Privacy, you can protect the privacy of your domain for free. Spammers won’t be able to see your contact information this way.
After that, you’ll be taken to a page where you can sign up by giving your name, email address, etc.
In the next step, you can choose how to pay. There are many ways to pay, such as with a credit card, debit card, PayPal, etc. If you have a PayPal account, it’s very easy to pay.
2. Choose a good web host.
After buying a domain, you need web hosting. Hosting companies give you a place on the internet where you can keep your website’s content.
Read this to learn about web hosting: What is hosting a website, and how does it work?
There are many companies that offer hosting services on the Internet. Here are some of the names of these good and well-known companies:
- Hostinger
- HostGator
- Bluehost
- HostBro
We’ve written a separate article about the services and prices of all of these, which you can read here: Where to buy Best Web Hosting for cheap?
Here, we use Hostinger as an example because it is a very well-known company where you can buy cheap hosting.

First, go to Hostinger’s website and click on the “start now” button.
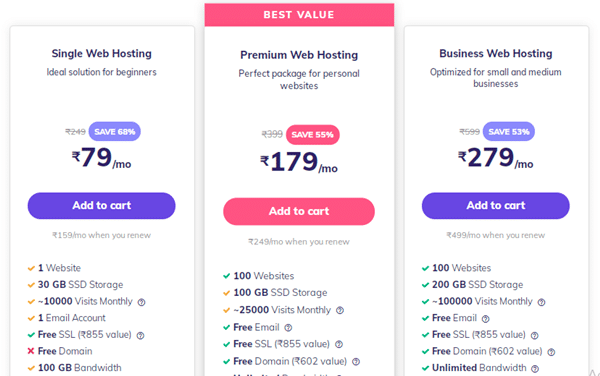
Below are three types of hosting plans, from which you can choose the one that best fits your needs:
Single Web Hosting: Choose this plan if you only want to make one website.
Premium Web Hosting: Choose this plan if you want to make more websites in the future. This can host up to 100 sites.
Business Web Hosting: You don’t need it at first if you’re just making a personal website or blog.
You can always switch from one plan to another.
3. Link the domain to the hosting service.
It’s very easy to link a domain to hosting. Nameservers are needed for this. Each hosting company also has a different set of nameservers. You don’t have to worry, the nameservers are listed below:
Hostinger Nameserver:
- ns1.dns-parking.com
- ns2.dns-parking.com
Bluehost Nameserver:
- ns1.bluehost.com
- ns2.bluehost.com
Hostitbro Nameserver:
- dns1.hostitbro.com
- dns2.hostitbro.com
If you use Hostgator or any other hosting service, you will get nameserver on your email id or cpanel.
Now sign in to your Domain Provider’s website:
Since we bought the domain from Namesilo.com, we will sign in to the Namesilo website. After that, go to Domain Manager.
Choose your domain and click on the option above that says “Change Nameservers.”
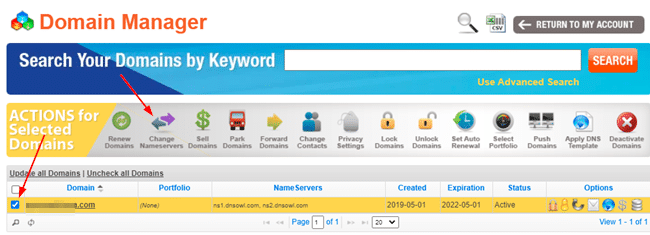
By default, there will be 3 nameservers there. You will have to delete them and add a new one. We bought hosting from Hostinger, so we will use the nameservers from Hostinger.
Now, only your domain name will be linked to the hosting server. It could be a while before this happens. Even though this work can be done in just one hour, DNS propagation can take up to 24 hours.
4. Install WordPress
WordPress is a type of Content Management System (CMS) that makes it easy to run a blog without having to know anything about computers.
After the domain is connected, you can log in to Hostinger, where you did the hosting. In Hpanel (cpanel), we will see Auto Installer (or app installer). Click on it.
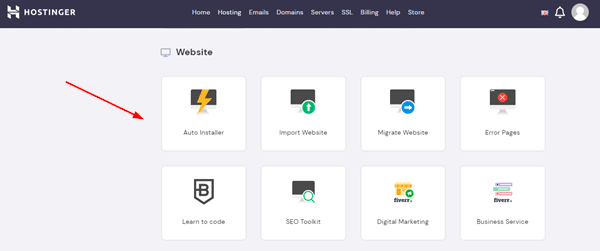
After that, choose WordPress. On the next page, you’ll need to enter an Administrator Username, Password, Email ID, and the title of your website. The rest can be left blank.
Keep in mind that you will be able to log in to your WordPress site with this username and password.
Now, you can go to your website’s admin url to log in right away. You can also log in by clicking on the Dashboard button in the cPanel’s WordPress section.
5. Choose a great WordPress Theme
Now that your site is almost done, you should pay attention to how it looks. You’ll need a good theme for this.
To choose the theme, do the following:
- First, go to your site and log in.
- Now, click on Themes on the left side of Appearance.
- Then click Add new.
- You search for a theme by typing its name.
- Install the theme you want and turn it on.
When you choose a WordPress theme, keep these things in mind:
Always choose a responsive theme, which changes itself to fit any device’s screen size.
Use a simple theme. If you use a theme that is too fancy or full of colours, it looks unprofessional.
Must check how fast the site loads. Use a cream that isn’t too heavy and doesn’t take too long to load.
If you can, use a Premium Theme. You may have to pay money for this, but the quality and features will be better.
You can also use free themes. Some popular free WordPress themes that you can try are listed below:
- Astra
- GeneratePress
- ColorMag
- OnePress
- Neve
Aside from these, you can research many other themes and choose a great one. We’re ready to be your blog or website, so go to Posts and write an article to publish it.

